Call it a compilation of all the crazy projects I've come up with over the years. Call it a how-to for things around the house. Call it whatever you like :) It's what I do everyday. My blog is really just a way for me to share what I've learned over the years about home improvement, interior design, organization, diy, crafting and home repair. And most importantly it comes from always working on a budget and forever wanting to fend for myself when it comes to anything. I hope you enjoy (and learn a few things along the way :)

Monday, March 26, 2012

DIY candle with "remnant" wax


So this was a "use it or throw it away" day.  I went to change my scentsy wax block out and saw the pile of "used" wax I keep in my candle cabinet.  Old candle wax (where the wicks are gone but there is still wax), old scentsy wax (a jar where I pour all of the used "unscented" wax), old candles in bad colors, etc.

For this project I used an old blue taper I had for the wick.  Cut the taper in half or shorter.  The candle portion needs to be shorter than the height of the wax in the container.  This is easier to determine after the wax is poured into the container.   The wick needs to be as high as the top of the container to stabilize it (further explained below).


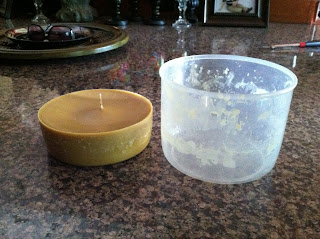
For the wax I primarily used the scentsy reject wax poured into these containers (there was a little old candle wax in the jar, too :)


To get the wax out of the jar, I just boiled it for a few minutes until enough melted that it would pour out.  It will just pop out of plastic. Sometimes you can break it out of a glass container with a butter knife if there is just a little, but this jar had a lot.


No photo for the next step, sorry, but once I was able to get the wax out of all the containers, I emptied this pan of water and placed all of the wax back in it.  I put it on low until it all melted and then poured it into my mold (this plastic bowl I have).  I then taped the wick to a pencil and balanced it on top to keep it centered and upright.


After refrigerating, I popped the candle out and there you have it.  A new big candle for free.  The exact amount I want to spend on every project : )


Notes:

You might use cooking spray to help get the candle out easily.  Took me longer to get it out than I wanted. 

You can easily clean the pot and bowl in the diswasher.  The hot water gets all of the remnant wax off.

In the future, I'm keeping an old taper in a jar and pouring my scentsy wax in as I use it.  Once it gets to the top of the taper, I have my candle : )

A Mason Jar works on my blender base!

Thank you to my Pinterest friends for this one.  Found an old mason jar in my candle cabinet today, so thought I would try it out on my blender to see if it fit!  It does!!!!  I have a Hamilton Beach glass blender and it fit right on.  Can't wait to grind some spices or make a dressing or whatever!  Now I'll be on the look out for more mason jars to make frozen drinks in individual servings!  Summer is looking better and better every day : )


Please note: do not use with hot or even warm liquids.  The pressure of the steam might crack the glass.

Here's what it looks like on (up close).  This is a smaller jar (I'll find a larger one to try, then I'll be on the hunt for the ones with the handles for mixed drinks ;)

Update Outdated Architectural Details

Do you have woodwork details in your house that look outdated?  Maybe an older mirror frame with a detail that's just out of style? It could be on a picture frame, a chair, a china hutch, etc. Something that just doesn't fit your decor (but the piece otherwise is just fine).  Maybe you can get a good deal on a piece with an unattractive detail!  Then all you need to do is cover it up!

Here are my corner blocks covered with a cast iron detail.


In my master bedroom, bathroom and study, my house had some corner block rosettes that were just down right ugly.  Imagine a corner block on a door frame with a hand-routed design.  It looked so cheap and old fashioned I couldn't stand it.

Drumroll please...here it is. I really don't know what they were thinking!


 Maybe for you its a shell or star detail like these.


I decided my corner blocks had to be covered up.  I could have bought new ones, finished them to match, taken out the old ones and put the new ones in.  But for fear of ruining woodwork or the sheetrock and paint, I decided to just cover it up.  I found a cast iron piece that fit the bill perfectly (and only 87 cents each!).   In Dallas we have an ironwork supplier that carries stuff like this (King Architectural Metals).  If you go to their website and search rosette you will see the extensive selection they have.  You want single faced so its flat on the back.

I used double-sided tape to put them up and it looks better than ever. The tape has held for 8 years now.  I also wet them and set them outside for a little while to get them to rust a little. Help them blend better with the wood finish.  Here's the after photo


Try an appliqué over the unwanted detail instead of getting rid of it!

Here's a before and after.  Night and day in my opinon. Hope this inspires you to update a piece of you own : )

Cover unsightly unused wall plates with ceiling tile wall art

If you are like me and have a few weird plates on your walls you don't use, here's an easy way to hide them. Use a ceiling tile!

I used one that is intended to hand on the wall. It goes right over them. In my case it was a phone outlet and audio control we don't use. It might be an unused plug, light switch, cable outlet, etc. Because these metal wall art pieces are hollow on the back, there is room for the switch plates to hide behind it and the tin still lies flat on the wall.

Easy fix for any spot on your wall that would require new sheetrock, texture and paint. Easy solution!

Friday, March 23, 2012

Hang a chandelier in your master bath

If you have ever seen my blog, you know I'm a fan of chandeliers : )  One place I absolutely love to see a chandelier hanging in a home is in the master bath.  It makes a rather sterile room come to life and become the retreat it should be for you.  If you have any sort of overhead light in there, transform the look of that room with a chandelier that compliments your decor.


For me it was a crystal chandelier I found on clearance at Tuesday Morning for $20.  I had an overhead light over my tub that was just crying out for a statement light fixture.  Twenty minutes after getting it home, it was up and turned out better than I could have ever imagined.


If you don't have an overhead light in your bathroom, look around your house.  There is somewhere you can bring a little more elegance into your home.  You're worth it :)

Thursday, March 22, 2012

Terrarium from a fish bowl and iron basket

I've been looking for a glass candle holder to put this old fish bowl on to make another footed jar. Unfortunately I just can't find anything large enough.

Today I went to store it under my china hutch, so I set it in this iron basket that was under there. I realized it actually looked really good together. Sort of like a decorative terrarium. New decoration without even trying :)

I might use it to hold wine corks when I run out of space in my other jar, too. Lots of display ideas of course :)

Wednesday, March 21, 2012

Another refinished polished brass light fixture


This one is in my master bath.  In this case I had a lot of finishes competing, so I had to mix it up.  Since the mirror molding is a black and metallic dark brown finish and a blacker iron piece is hanging above, I decided the fixture needed to be different enough that it didn't start all looking the same.  So I painted this one with brown craft paint first. Again right on the original finish. 

This is the original fixture (before the mirror frame was added).  I did not sand or prime it (since it won't be touched) or take it down (I just taped around it and removed the light globes).  I used the stipple painting technique again so it has texture.


This is after the brown (no mirror frame up yet).


As you can see its a little flat at this point.  Then I drybrushed the whole thing with the lighter metallic bronze craft paint to give it shine and interest, then I highlighted with Modern Options Sophisticated Finishes Blackened Bronze (its darker, so it gives it more richness and helps it coordinate with the darker frame and iron piece).  Notice the frame is on the mirror now : )


Here's a close up shot of the finish.


Here's the before and after shot  (quite a difference!).


Another 7 years and counting...at least I know the finish lasts : )   Good luck painting yours!