
Thursday, February 23, 2012
Footed Candle Holder - St. Patricks Day
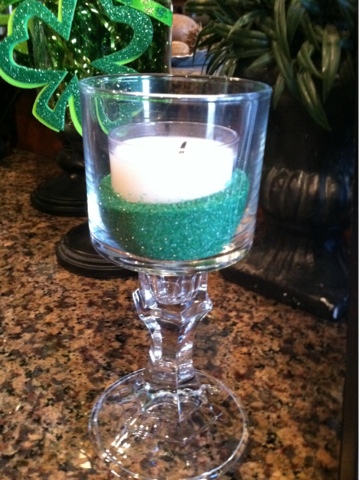
So now that I have created these footed candle holders and two are on my island with my holiday apothecary jars, I've decided to include them in the holiday theme changes. For St. Patricks Day, I changed the candles to white and filled the bottom with green sugar.
Dollar store and Bath & Bodyworks footed candle holder
Well recently I bought some candles from Bath & Bodyworks for $1, which included the glass holder and a candle in a plastic holder. It wasn't something I would ever set out, since it is too small and too simple. Of course, they smelled so good and were marked down to be so inexpensive, I couldn't pass them up.
Why not add a glass candlestick to the bottom to make them something nicer to set out. Love the results! This is the one I set out on Valentines. Next year I'm adding candy hearts.

St. Patricks Day Apothecary Jars
Here's my latest holiday update to my apothecary jar set...St. Patrick's Day. I couldn't come up with a three letter word to do, so I used clovers. These are foam clover coasters from Dollar Tree. I doubled them up, then cut out the centers. I continued with the foil confetti inside (green this time obviously, one bag from the Dollar Tree). The ribbon I found for $1 at JoAnns. It has glittery clovers on it so it was a much use : )


My set isn't available at kirklands anymore, but here's a set from amazon that is a good deal and looks very pretty
Sunday, February 12, 2012
My next dollar store apothecary jar
I had another plain covered jar, so I had to create another apothecary jar. I'm thinking this one might need a handle, but it looks much better than it did. I did take off the rubber seal to clean out the lid, since it was foggy or dirty inside. I left it off, too, because I thought it looked better that way. I had the jar but got the glass candlestick from the Dollar Tree again. I'm loving these :)


Monday, February 6, 2012
Turn an open cabinet into a plate rack
I have a strange open cabinet in my kitchen over my built-in microwave. The previous owner had cook books in it, and it looked messy. You can never have enough storage, so I thought what can I display that would look neat but be functional. Well, my enormous dinner plates wouldn't even fit in my other cabinets laying flat, so where better to put them but in here.

If you've ever seen a plate rack its bascially two sticks that help stand them up. I had eight plates, so I needed 14 pieces of dowel (7 across, 2 deep). I moved the adjustable shelf up to the point where the plate would fit standing up, then measured the height to figure out how much doweling I would need. I headed to Home Depot and bought the 3 foot pieces of 1/2" wood dowels, making sure I had enough to make enough pieces. I added 1" to the height I measured to allow for the insertion of the dowel 1/2" into the top and bottom of the opening.
I cut all of my pieces and started measuring for the drill holes. I took the shelf out and measured it from side to side (26-1/2"). Since I had seven 1/2" dowles across, I subtracted the width of all of those (3-1/2") to determine the amount of space between all of the dowels. I then divided by eight to figure out the width between each dowel (for me that number was 3-1/4"). I took that number and added 1/4" (half of the dowel width). That gave me the center point to drill for the first dowel. From that dot I measured 3-3/4" for remaining six points (3-1/4" plus the last half of the previous dowel and the first half of the next dowel). I repeated the dots for the back row. For me I put the rows 5-1/2" from the back and front (the depth is 17"). I know its seems like its getting complicated so here's a diagram.

It's really simple, that's just how my brain worked it out. You may be better at measuring the whole thing, dividing by eight then just winging it (I don't think if they were 1/4" off here or there anyone would notice). Since the shelf was the top, I repeated the marking on the bottom with the same measurements.
Before I started drilling, I placed the shelf, then used one of the cut dowels to make sure my dots where in the right place. I then used a 3/4" wide drill bit to drill about a 1/2" into the wood (you can mark that spot with tape on your drill bit if you want to). I would also recommend only drilling one hole (top and bottom to get the idea of how its going before you do the whole thing). Once you are happy with the first, finish them off. Lastly place all of the dowels.

There may be some that are tight or too tall, just have sandpaper handy to deal with any problems as they arise. I did not glue these. They fit snuggly so they don't move, and they were thin enough that they just "bent" into place (meaning I didn't have to try to lower a shelf onto 14 sticks and try to line them up.
This would also be a neat project in a cabinet with glass doors as well. Hope this helps get you motivated to try it. I love it and we use the plates everyday (as you can see since one is currently not in there : )
Dollar store apothecary jar
OK, here's another pinterest inspiration. Saw a pin from someone that showed a girl at a dollar store making a $2 apothocary jar out of a glass jar with a lid and a glass candle stick. So simple. All you do it hot glue the candle stick to the bottom of the glass jar. Here's the after shot.


I actually had several old glass jars with lids that were just too little and plain to put out anymore, so I stored them away with bath products in them. You can probably find them at the dollar store or thrift stores, too. Here it is, ready to display, filled with shells form a previous vacation.

Can't wait to display it. It's amazing what adding the "foot" does for this plain boring glass container.
Thanks for yet another great idea my Pinterest friends. I'll post the others as I complete them (only bought one to see if I liked it first). Might be cleaning out the glass candlesticks at Dollar Tree today.

AFTER
And here it is before I put the foot on it.

I actually had several old glass jars with lids that were just too little and plain to put out anymore, so I stored them away with bath products in them. You can probably find them at the dollar store or thrift stores, too. Here it is, ready to display, filled with shells form a previous vacation.

Can't wait to display it. It's amazing what adding the "foot" does for this plain boring glass container.
Thanks for yet another great idea my Pinterest friends. I'll post the others as I complete them (only bought one to see if I liked it first). Might be cleaning out the glass candlesticks at Dollar Tree today.
Cute and easy valentines box idea
This is my older daughter's Valentine's Day box for fourth grade that is getting its third use this year by my younger daughter. Super simple.

We took a boot box (we have learned from experience that you need a larger box with a larger hole if you don't want it to get ruined : ) and cut a hole in the top. We were lucky that ours was plain and cutting the hole took off the only lettering on the box. If you have logos and lettering, just decoupage plain paper over them first before you move to the next step.
We decoupaged different colors of tissue paper on it. We had light pink, hot pink, lime green, pink/white zebra, and purple/pink/white striped (all left overs from gifts given to my girls). We used a glue stick to stick it all down (as my daughter had to be the one to do it). She decided to cut the tissue into circles first, but you could do much easier squares or triangles, too.
Next we wanted to add detail, so I used some lime green ribbon from a gift reuse as well and "faux" wrapped the box with it. We still needed to be able to open the box, so we layed it across the box, then taped it just under the outside part of the box. The ribbon is not actually glued to the box so it can be taken off and reused later.

Where the ribbons crossed we wanted a detail, so we added a flower. We had this from one of our flower pen projects (probably picked a bouquet of fake flowers up from the dollar store). It sat up too high on the box, so I made a quick "filler" bow out of some balloon ribbon I have (you know wrap it around your hand like 25 times, tie it in the middle of the circle with a piece of ribbon or a twist tie, then "fluff" it to look like a messy bow). We hot glued that onto the box, then the flower onto that.
For her name, we used a letter we already had in her room for the first letter, then did bottle caps for the rest (printing the colored circles inside for the rest of the letters). You could use all bottle caps or letter stickers on paper instead of printing.

For patch up this year (my older daughter's name is longer and her first letter was larger). I used some pieces of the tissue that had wrapped around the inside of the box during the decoupageing to do repair where the bottle caps and larger first letter had torn the paper underneath when removed. You could just use more tissue if you had it, but I didn't have a color that matched.
Hope the idea inspires : )
Paint your brass hinges!
Have you decided to change out your door hardware but trying to save money wherever you can? I did just that (had awful polished brass levers I decided to change out). But its not just the knobs, its the door stops and hinges, too. I decided to try to paint the hinges first (thinking why not try, if it looks bad you can just replace them after all). First hinge and I loved it. Saved lots of money and took less time than unscrewing and rescrewing 6 screws per hinge on the 28 doors that are in my house (almost 100 hinges and 1,000 screws!). I didn't even have to tape off because there is a natural break between the hinge and the wood. You can see by the two pictures below that lighting affects the look of the color, inside a home without a camera flash they look dark like the bottom one.


One replacing hinges note, my friend replaced her hinges vs. paint them and had a heck of a time with several doors closing weirdly once she replaced them (thirty minutes per door trying to figure out which hinge was making them close tilted).
Regarding the doorstops, I found that you can paint the door stops, but you need dark caps (and those cost just as much as new doorstops on ebay, so I just went the new doorstop route). That might change as time progresses and everyone starts needing new dark doorstop caps. I bought the same kind of door stops I had in the darker color, so I could just unscrew the brass and screw in the new ones super fast (no taking of the screw from the wall).
I also tried painting the door handle itself since I liked what I had, but it just chipped really quickly no matter what kind of paint I used (mine were shiny polished brass, I sanded an extra piece I had and painted it will primer and metal spray paint. I also tried metal art paint and enamel and none worked. Finally had to go full knob replacement. I did find a great affordable place in Dallas that I will share on a later post.
Good luck!


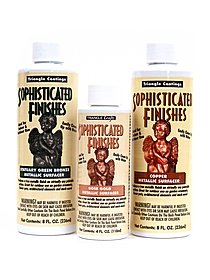
The product I used it my very favorite oil rubbed bronze "look" paint. It's Modern Options Sophisticated Finishes in Blackened Bronze. I get mine at Michaels and its not in the craft paint section. It's in the metal paint section near the unfinished wood in my store. Call around before you drive around. It's super easy to use and a great deal based on how long it will last you. I've probably painted 100 things in my house with it (in addition to the hinges). Instead of replacing all of my shiny brass, I just painted it! This is there website so you can see all the finishes they have http://www.modernoptions.com/ and here is what the product/finish looks like (blackened bronze is on the left).
I prefer a "pouncing" or "stippling" method of painting vs. brushing, as it looks more textured with a natural or modeled finish vs. obvious paint stroke lines. If you want a flat finish you'll probably need two coats and a good brush. I literally use kids paint brushes from the dollar store (cut a little if they are too long to "pounce".
One replacing hinges note, my friend replaced her hinges vs. paint them and had a heck of a time with several doors closing weirdly once she replaced them (thirty minutes per door trying to figure out which hinge was making them close tilted).
Regarding the doorstops, I found that you can paint the door stops, but you need dark caps (and those cost just as much as new doorstops on ebay, so I just went the new doorstop route). That might change as time progresses and everyone starts needing new dark doorstop caps. I bought the same kind of door stops I had in the darker color, so I could just unscrew the brass and screw in the new ones super fast (no taking of the screw from the wall).
I also tried painting the door handle itself since I liked what I had, but it just chipped really quickly no matter what kind of paint I used (mine were shiny polished brass, I sanded an extra piece I had and painted it will primer and metal spray paint. I also tried metal art paint and enamel and none worked. Finally had to go full knob replacement. I did find a great affordable place in Dallas that I will share on a later post.
Good luck!
Thursday, February 2, 2012
How to frost a window using contact paper
If you haven't discovered this product yet, there is transparent contact paper that is "sort of" transparent. It isn't clear at all. It's frosted. I've used it for many, many years to frost windows. The same roll has lasted for 14 years. Frost windows over windows (you want to let the light in but don't want the neighbors to see in from your second story windows). That was the case in my old house. There was no need for an expensive custom shaped treatment.
Frost windows in doors (you want the light but need the privacy). This is this case in my current house. I have a door in my laundry room with a window in it. We often change in there and don't want the neighbors to see, but want all the light we can get that a blind or window treatment would obscure. The glass has etched in divided lights, and the contact paper still went on just fine.

You can also frost sidelights beside doors. I see those alot at front doors, and those bunch sheers just look dated. Again, you will get all the light with privacy and no need for odd small window treatments.
TIPS:
- I spray a little diluted windex before I start to apply it to make the bubbles easier to smooth out.
- I start with the top only, then slowly pull the paper off with one hand as I use my other hand to smooth out bubbles
- if the roll isn't wide enough, butt the factory edges together to get the best seam between pieces (you can sort of see the seam in my picture above on the far right (running through the second w in window)
- cut the contact paper to size before you apply it, but leave a little room for shifting (using a box cutter or exacto blade to cut any excess once the paper is down).
Here is what the product looks like (mine is Contact brand, but I saw a different brand at the dollar store the other day...can't guarantee it will give the same results)

Here's a link:
Transparent Contact Paper
This doesn't seem to work as well at frosting cabinet glass. Because the contents of the cabinets are so close to the glass you can still see everything inside. Works great on windows since nothing is right up against it.
Hope that helps!
Frost windows in doors (you want the light but need the privacy). This is this case in my current house. I have a door in my laundry room with a window in it. We often change in there and don't want the neighbors to see, but want all the light we can get that a blind or window treatment would obscure. The glass has etched in divided lights, and the contact paper still went on just fine.

TIPS:
- I spray a little diluted windex before I start to apply it to make the bubbles easier to smooth out.
- I start with the top only, then slowly pull the paper off with one hand as I use my other hand to smooth out bubbles
- if the roll isn't wide enough, butt the factory edges together to get the best seam between pieces (you can sort of see the seam in my picture above on the far right (running through the second w in window)
- cut the contact paper to size before you apply it, but leave a little room for shifting (using a box cutter or exacto blade to cut any excess once the paper is down).
Here is what the product looks like (mine is Contact brand, but I saw a different brand at the dollar store the other day...can't guarantee it will give the same results)

Here's a link:
Transparent Contact Paper
This doesn't seem to work as well at frosting cabinet glass. Because the contents of the cabinets are so close to the glass you can still see everything inside. Works great on windows since nothing is right up against it.
Hope that helps!
Wednesday, February 1, 2012
Using table clothes for drapes
Tablecloths come in tons of fabrics and lengths and they are a lot more affordable than drapery panels!
Now that ring clips have been back in style as drapery hardware for a while, it makes it a lot easier to use raw fabric as drapes. But who wants to hem fabric? Don't we all want a no sew easy drape that is super affordable and fits our window perfectly? We don't ask for much :)
One thing I always noticed was that my linen stores always had tons of tablecloths on clearance (or that they were down right cheap compared to drapes), yet they seemed like the same thing.
Not to mention that in my area windows are soooo tall and there were never panels long enough for my windows.
Tablecloths come in lengths as long as 120" standard! Some as cheap as $10 regular price.
I've used tablecloths in both my dining room and master bedroom and love them. I've posted pictures of both on other posts noting tie backs and hanging methods, but here are some additional photos. Happy hunting!
Adding trim to plain lampshades
These are both additions to chandelier shades, but obviously it would apply to any lampshade. All you need is hot glue!
The more "feathery" trim is actually two trims hot glued on the outside of a parchment type shade. The first trim was dangle beads on ribbon, then whispy upholstery trim glued on top of that. Gave a very plain chandelier some interest.
The second was upholstery trim with beads already on it glued to the inside of faux leather shades. For some reason I just didn't like how it looked on the outside. Just shows it works either way.
I get all of my trims at Hobby Lobby during 50% off or on remnant, so both redos cost a total of $10. Just measure the inside of one shade and multiply to see how many inches you need. Don't cut anything until it is glued on the shade. So you don't end up making a bunch of wrong cuts.


The more "feathery" trim is actually two trims hot glued on the outside of a parchment type shade. The first trim was dangle beads on ribbon, then whispy upholstery trim glued on top of that. Gave a very plain chandelier some interest.
I get all of my trims at Hobby Lobby during 50% off or on remnant, so both redos cost a total of $10. Just measure the inside of one shade and multiply to see how many inches you need. Don't cut anything until it is glued on the shade. So you don't end up making a bunch of wrong cuts.
Good luck :)


Use jewelry as tie backs
As you may have seen in my post about using iron to raise the height of your window treatments, my drapes in my master bedroom didn't have tie backs. They had previously, but on a whim several years back I took them off to "streamline" them.
Well today on Nate Burkus I saw him use some neat studed tie backs, so I accepted the challenge. I found an old long necklace in my jewelry box that looked similar, split it in half and wrapped it around each drape twice (hooking it onto a cup hook screwed into the wall). Love a free change :)


Well today on Nate Burkus I saw him use some neat studed tie backs, so I accepted the challenge. I found an old long necklace in my jewelry box that looked similar, split it in half and wrapped it around each drape twice (hooking it onto a cup hook screwed into the wall). Love a free change :)
Subscribe to:
Posts (Atom)