
Sunday, December 16, 2012
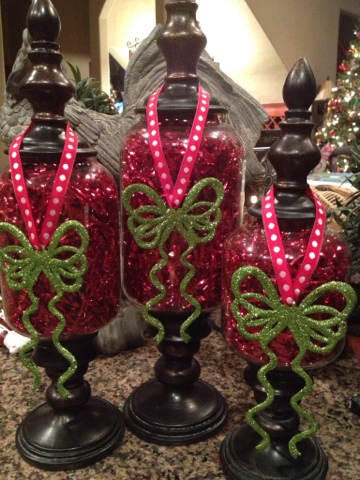
Christmas apothecary jars
Here are my latest holiday apothecary jars for Christmas. I used the red confetti filler from Dollar Tree and green bow ornaments tied with red and white ribbon. Decided not to spell a word this time, because I set my noel sign right in front of them. Looked like too many words :)
Friday, December 14, 2012
Great gingerbread house party game
We just had a gingerbread house decorating contest at our bunco group Christmas party...so fun!!!! My friend Laurie and I by far made the best one. Total cake wars!


Monday, December 10, 2012
Children's Christmas Crafts as family gifts...over the years
Christmas is on its way, and we are all looking for gift ideas for our family. I have always had my children make a Christmas craft for our family as an "exchange" for all the gifts they receive. Something personal that they make (with me of course) to show their relatives that they appreciate what they receive and have something to give in return. Even though they can't afford to buy anything, they can make something that matters.
I've always been a fan of handprint/footprint crafts because they capture a snapshot in our children's lives. They love comparing the hand/foot size and we enjoy the memory of how little they once were.
Since my youngest daughter was born, I have created different Christmas themes with their prints and placed them on different items as time goes on. The most important part is including their names/ages and the year : ) As they grow, they are able to contribute with the craft more and more independently. They are so excited to make them each year.
Year One - Snowmen with light blue footprints on a balsa wood rounded-corner tray.
Year Two - Christmas tree with green handprints on a sleigh. This time I used darker green paint for my older daughter and light green for my younger daughter. so the prints could be differentiated in the pile : )
Year Three - Angels made with white handprints on a raised-side tray.
Year Four - Santas with handprints on a scalloped tray. This one is a little more involved, as I painted their hands with all three colors then pressed them down (added the white dots for the fur hat trim after).
Year Five - Reindeer with brown footprints and black handprints on a curved side-tray. Chose Rudolph and Clarice as the subjects : )
Year Six - Holly with green handprints on a curved-side tray.
Year Seven - Elves with green and apricot handprints on a raised-side tray. Hat trim is added after again.
This is the year I started making one tray for us and making ornaments for the family. I figured the trays were a little large, and the ornaments could simply be hung on a tree. Not to mention their hands and feet were getting a little too big for the trays : ) I make them two-sided so each child has their own side. This issimply scrap luan I cut into rectangles.
Year Eight - Snowmen with light blue handprints on a raised-side tray. Snow landscape was added after.
For the ornaments this year, we used popsicle sticks glued "raft-style" and only their fingers show on the oraments (vs. their whole hand). My girls were able to build these on their own which is nice.
Year Nine - Reindeer done with brown fingerprints. The ornament is one-sided, as ten fingerprints fit just fine on one side (the year is written on the back). This is the year we dropped the tray all together (even I was running out of display space : )
Year Ten - Penguins done with black handprints. The white bellies were added after.
So that's it. My ten examples of handprint/footprint/fingerprint Christmas crafts for the kiddos to give as gifts. I'll post each year's craft, as we make them, to keep you updated on the latest idea we have come up with : )
Tuesday, December 4, 2012
Christmas tree craft made with molding and Popsicle sticks.
Last year on my Christmas crafting bender I decided to make a Christmas tree out of Popsicle sticks. Don't ask me why :)

I started with a pile of plain popsicle sticks and a hot glue gun. As I stacked and glued, the shape started to come together...I realized this was going to be cute and needed to be more thought out.
Once I had a shape I was happy with, I dug through my spray paint collection and found a forest green from who knows when (early 90's?)....I told you I keep everything! I spray painted the whole thing green.
I decided it needed a trunk, so I used a large tongue depressor and colored it brown with a sharpie and glued it to the back.
Then I needed something to put it on. I dug through my scrap pile and decided on the same molding I used for my Noel sign. This time I needed two pieces wide to make it big enough. I cut the two pieces to the same length and glued them together bottom to bottom.
To add detail I painted a green and red polka-dotted border (using a pencil eraser to apply symmetrical dots). I also painted the same dots on the tree as ornaments at random locations.
To top it all off I glued a foam yellow star from my daughters' craft buckets on top.
Voila! Free "scrap" Christmas craft :)
More christmas movie quotes...
If you read my previous post, I am on a movie quote kick this year. I've displayed them in my bar, my half bath and even in my hall. The Elf quotes previously mentioned replaced art I had hanging, but in my hall I decided to hang the pictures on top of the art. In this case they are hanging on top of tin tiles.
First I found a great Grinch quote on Pinterest and printed it:
"Maybe Christmas, he thought, doesn't come from a store. Maybe Christmas...perhaps...means a little bit more!"
Then I used the template to create a second so I had a pair. This time using a line from A Christmas Story:
"Christmas was on its way. Lovely, glorious, beautiful Christmas, upon which the entire kid year revolved."
I framed them in the same dollar store frames. To hang them over the tin tiles, I hot glued ribbon to each top corner, then hooked the ribbon on the nail used to hang the tile on the back.
Fast, inexpensive and simple.


Displaying your favorite Christmas Movie quotes.
One of my family's favorite activities during Christmas is watching all of the great Christmas movies that come on every channel. Classics like A Christmas Story, The Grinch and Elf are definitely my favorite. This year, after seeing all the great printables on Pinterest I decided to make a few.
I first started with Elf. There were three posted on Pinterest in a cute pink, blue, green and red theme that I printed first. Some of my favorite lines, too.
"I just like to smile, smiling's my favorite."
"We elves try to stick to the four main food groups: candy, candy canes, candy corns and syrup"
"The best way to spread Christmas Cheer, is singing loud for all to hear."
Unfortunately this set was missing my VERY favorite Elf quote:
First we'll make snow angels for two hours, and then we'll go ice skating, and then we'll eat a whole roll of Toll House cookie dough as fast as we can, and then to finish, we'll snuggle."
So had to make my own...
I put the set original set of three in my bar on the glass shelf.
The single I hung in my half bath.
Most importantly, they are all displayed in dollar tree frames!


DIY Christmas signs
One of my many Christmas crafts last year included this cute Noel sign. Just about as simple as it gets. Four letter gingerbread ornaments (purchased the previous year on Christmas 90% off clearance at Kohls), an old left over piece of crown molding, a small piece of PVC pipe.
I started with the four ornaments and took the screw eye hangers off that came on them. The molding scrap was ready to go. It was already this length and was already primed, giving it this whitewash look. It was left over from my living room molding project in my old house. The PVC pipe remnant was just that size in my remnant bin as well. It was left over from a recycle bin rack project.
I hot glued the letters to the molding, then hot glued the PVC pipe piece to the back so it would stand up on its own. And done. Just that simple.
This year I found the green star in our ornament bin and decided to add it to the corner to give it a little sparkle.
Super easy DIY sign that couldn't be a quicker or cheaper craft!


Christmas chandeliers
One of my favorite things to decorate at the holidays is my chandeliers! Every year I try to mix it up a little, but I'm such a fan of crystal ornaments that I have to include those on each.
The chandelier over my stove is the simplest with a crystal ornament hanging from each of the 5 arms and a simple knot bow tied onto each.
The chandelier over my kitchen table gets one crystal ornament on each of the 10 arms, but I alternate hanging them high and low to give it a little more depth. These crystal ornaments get the same knot bow, but I added garland around the middle this year to beef it up.
My formal dining chandelier is a lot larger, so it gets 12 crystals with knot bows hanging on the two levels. This chandelier also has a ring at the bottom on the center, so I hang a new ornament there each year. This year it's a large lime green jingle bell.
Hope these inspire you to dress up your dining rooms even more for the holidays.


Monday, December 3, 2012
Adorable scrabble wall art
Created by my sister. Cardboard, wood contact paper, and a big fat sharpie...its big too, board is 22" x 27"

Tuesday, November 27, 2012
Great cutting board to use as a sink cover
Yesterday I decided I would like a cover for my prep sink in my island. Often I'm serving food off the island, and the sink is a mess by the time everything is prepared. It would be so nice to just be able to cover it up.
 So I measured the opening, searched online and found a highly rated wood cutting board at walmart of all places. It's by Paula Dean. 22" x18" x 3/4". Acacia wood (apparently stronger than bamboo). I found it in stock at my local store, so Ipicked it up along with mineral oil to condition it (in the health/beauty section).
 Total cost for both under $30.
This board is so pretty I'm almost afraid to cut on it :). Provides extra counter space. Absolutely love how it looks and as a bonus, it's fits over my main sink, too :)


This board is so pretty I'm almost afraid to cut on it :). Provides extra counter space. Absolutely love how it looks and as a bonus, it's fits over my main sink, too :)
Thursday, November 8, 2012
First Mammogram :$
So I turned forty this year, and its time for my first mammogram. In honor of this wonderful experience and a great friend who has since moved away, I thought I would post something she said to me one time that made me roll with laughter.

Sad because it is sooo true!
Create a "Taylor Swift" guitar for $2 : ) The total costume $10!
So my daughter wanted to be Taylor Swift for Halloween. Always working on a budget, it became my challenge to make it happen...and cheap!
.JPG)
Hair - blonde, curled (free, my daughter has blond hair and we have a curling iron)
Makeup - natural, long lashes, red lips (free, have all that)
Shoes - boots (free, have those)
Jewelry - simple necklace, earrings and several bracelets (free, have those as well)
Guitar - NEEDS WORK (have a blue dragon "student" guitar my daughter got for Christmas a few years ago, but that won't work)
Dress - NEEDS WORK (have no fancy dresses)

First stop was Ross to get a dress. My daughter may be 13, but she is tiny. No Taylor Swift style dresses in the girls department, so we head to the teen department and find several options on clearance. We finally settle on a cute aqua strapless dress that is on clearance for $7.49. It's huge on her, so I'll have to dart the back, but I like that it doesn't hug her body making it more age appropriate.
We get the dress home and 10 minutes of sewing (two darts up the back), and it fits. The dress is done.

Step two: Guitar. My first notion is to paint the guitar, but I realize the taping off is going to be impossible and the caps on the top are plastic and royal blue...can't change those, so it won't work.

Next option, see if the dragon will come off, so we can glitter it like Taylor's. Low and behold, the dragon peels right off like those repositionable wall decals. SCORE! And of course we took off the "learning" letter stickers : )
 This gives me an idea. Why not just use the wall decals you can buy at the dollar store to redecorate it. In fact I already know which ones I want. I had previously seen some silver dandelions there that were so pretty...I didn't get them because they didn't go with my decor, but on this guitar they would look great!

So we head to the Dollar Tree, and amazingly we get the LAST ONE! While I am there with my daughter I realize we might want to put "Taylor Swift" on the guitar so people know who she is dressed as. Head over to the crafting section and pick up the silver glitter glue for a dollar (would have preferred a paint pen, but this worked, and we were able to peel the glitter glue off after Halloween).

After about 15 minutes of placing the stickers and spelling out Taylor's name (I did reference her signature online, so I could try and copy it), it looked great, and most importantly my daughter loved it!

Her costume turned out so cute.
.JPG)
Hair - blonde, curled (free, my daughter has blond hair and we have a curling iron)
Makeup - natural, long lashes, red lips (free, have all that)
Shoes - boots (free, have those)
Jewelry - simple necklace, earrings and several bracelets (free, have those as well)
Guitar - NEEDS WORK (have a blue dragon "student" guitar my daughter got for Christmas a few years ago, but that won't work)
Dress - NEEDS WORK (have no fancy dresses)

First stop was Ross to get a dress. My daughter may be 13, but she is tiny. No Taylor Swift style dresses in the girls department, so we head to the teen department and find several options on clearance. We finally settle on a cute aqua strapless dress that is on clearance for $7.49. It's huge on her, so I'll have to dart the back, but I like that it doesn't hug her body making it more age appropriate.
We get the dress home and 10 minutes of sewing (two darts up the back), and it fits. The dress is done.

Step two: Guitar. My first notion is to paint the guitar, but I realize the taping off is going to be impossible and the caps on the top are plastic and royal blue...can't change those, so it won't work.

Next option, see if the dragon will come off, so we can glitter it like Taylor's. Low and behold, the dragon peels right off like those repositionable wall decals. SCORE! And of course we took off the "learning" letter stickers : )


So we head to the Dollar Tree, and amazingly we get the LAST ONE! While I am there with my daughter I realize we might want to put "Taylor Swift" on the guitar so people know who she is dressed as. Head over to the crafting section and pick up the silver glitter glue for a dollar (would have preferred a paint pen, but this worked, and we were able to peel the glitter glue off after Halloween).

After about 15 minutes of placing the stickers and spelling out Taylor's name (I did reference her signature online, so I could try and copy it), it looked great, and most importantly my daughter loved it!

Her costume turned out so cute.
Reconfigure Plantation Shutters to open differently :)
I'm sure there aren't that many people out there that would like to reconfigure their shutters, but I personally wanted to place a chair and table in front of a window. In order to do so, I had to change my shutters. They opened like two books, instead of accordian style. This meant nothing in the room could be placed within two feet of the window if i wanted to open the shutters.

.JPG)

.JPG)
.JPG)

.JPG)
I decided I wanted them to fold to the sides. Simple enough right? :) So I went to home depot and bought six flap hinges (like the ones you use on doors but smaller).
I took all four shutters off the existing hinges. This is what the hinges looked like that held them on the sides and on the center support. The side sets are left because they will still be used to open the shutters to the side. The center sets were removed since they would no longer be holding anything.
I layed the shutters flat on the ground in pairs and screwed the new hinges to the inside centers, so they would fold in half. I used three per shutter since mine are about 7 feet tall (and that's how many they used on the sides...wanted the center ones in the same spots as the side ones).
TIP: Make sure you place the hinges correctly. They do not close flat both ways. They are like a book. So before you screw them in, place them, flap them closed and make sure they lay flat together. Then reopen and attach. If you do place them incorrectly, no big deal, just take them off and turn them over and reattach : )
At this point I reattached the combined shutter sets to the side hinges still on the window (had a little help holding the shutter as I screwed them back up as the shutters are huge) and I was almost done.
There were also some magnetic closures that would need to be adjusted. They were currently in the middle of each set at top and bottom to keep the "book-closing style" shut. I left one in the center on the top to keep the center flat, then moved one to the outside to keep the new "folding style" closed on the far side.
The easiest way to do this is move the magnet closure and reposition it. Remove the metal plate that it attaches to. Place it on the magnetic closure, close the shutter, then mark the screw hole for placment on the shutter from the back. If you can't access the shutter when it is closed, put a dollop of something on the screw hole, close the shutter, open it and the dollop will be on the shutter to show you where to put the screw.
And this is what it looks like now with the chair and table. About a thirty minute process to add a little character to my room. Mainly it gives my daughter a place to sit and wait for carpool : )
.JPG)
Subscribe to:
Posts (Atom)