Call it a compilation of all the crazy projects I've come up with over the years. Call it a how-to for things around the house. Call it whatever you like :) It's what I do everyday. My blog is really just a way for me to share what I've learned over the years about home improvement, interior design, organization, diy, crafting and home repair. And most importantly it comes from always working on a budget and forever wanting to fend for myself when it comes to anything. I hope you enjoy (and learn a few things along the way :)

Thursday, March 29, 2012

The best wine bottle opener I've ever owned

I seriously can not believe I have not blogged about this product before now.


I currently own one of these rechargeable wine bottle openers and it's the best thing to hit my bar since I turned 21 (and I have to admit that wasn't recently :).

I have mine plugged in inside my bar and grab it any time I need to open a bottle.

It's so simple and does all of the work for you.
1. Cut the wrapper with the included cutter.
2. Hold opener down on top of the cork and press the down button until the cork comes out of the bottle.
3. Hold the up bottom until the cork come out of the opener.
4 Return it to its charger.There is seriously no work on your part.

I even take it with me to parties where I am bringing wine to drink. Everyone always comments on how easy it is!

Now I see it's only $11 on Amazon! Rechargeable wine bottle opener at Amazon  Well worth the money!

I think I paid $20, but it was worth that.  Here's mine in the cabinet.


Twine candle holder

Another Pinterest inspiration completed. A twine covered candle holder. I absolutely love this one, and it was completely free (my favorite kind of project).


Here it is lit : )


I actually had a spool of twine that the previous owner of my home left.  It has sat in my garage for at least 8 years now.


I also had these frosted candle holders that I hated but kept because they protect other containers from candle wax.

So this morning I started hot gluing the twine around and around for probably 20 minutes (though it seamed like an hour).  I could hardly believe how great they turned out. I think they look even better because my twine was old and rotting.

Here's the before and after shot:


Tips:

- Glue more times than you think you need to ( I thought I was going to put one spot of glue on the top and one on the bottom, but it's more like 4 times per line at least).

- Use just a little glue at each spot (you don't want to see it through the twine...here's a pic to show how little).


- Glue the entire bottom and top row to keep it from slipping off.

- Glue as needed to keep it all straight (you can manipulate it as you go by gluing and pushing down spots that aren't staying in line).

- If the twine breaks as you go, just glue the end, then glue the new start right next to it (if it's a blunt cut) or a little overlapping (if it is a frayed cut).  The above pic shows a spot where my twine broke...obviously it happened a lot since I've figured out this twine is basically unusable for its original purpose since its so rotten :)

- Depending on your type of twine, you might need to trim hairs off the outside when you are done

- This takes time and patience, which I dont have ver much of, so be prepared for that.

Hope this inspires you like the twine container I pinned inspired me :)

Spa sinks in my master bath

Well I finally got back to the dollar store yesterday, so I have added the river rocks to my master bath sink now. We begin the test to see how they do in sinks where toothpaste is being used. I'll kept you posted. I may have some really cute dirt cover for my patio pots here shortly :)


Wednesday, March 28, 2012

Use baskets in cabinets to maximize space!

If you've read my blog, you know I am a basket lover. I use them everywhere to help manage all of the clutter that comes along with kids.

One of my favorite places to put them is inside a cabinet. It turns an impossible place to store things into a drawer that can hold so much more. You can use every inch of space in there. Plus you can pull it out and take the contents where you need them.

In this case, this is my single lower cabinet in my laundry room. We use the top basket for everything swim team related, and the bottom for all things Girl Scouts.

These days it's so easy to find baskets that fit (at a great price, too). Ikea, World Market, TJMaxx, etc., etc...they are everywhere!

So look around your house for cabinets that would be better utilized if they had a basket "drawer", take note of the opening dimensions, then take them with you when you go shopping (I personally keep all that info in my Notes app on my phone). I'm sure you'll find the perfect ones in no time. Good luck organizing :)


Insulated beverage tub!

I was hesitant to blog about this product (you'll see why in a minute), but after getting it out for the first time this season I just couldn't help it. I absolutely LOVE this find.


It's the Coleman Party Tub Cooler. I always wanted a beverage tub, but knew it needed to be insulted or it would drip sweat. I happened upon this a few years ago and searched the Internet for a good deal on one.

Luckily I'm also an avid Craigslist shopper, and found one for $30 in the original box. I jumped on it and have never looked back. Might be the best summer product I've ever purchased.


The bad news... They don't sell them anymore! I've looked all over the Internet to no avail. I decided to go ahead and blog about it though.  Not because I like to brag about great products I have that you can't get :), but because there are other insulted beverage tubs out there. That's the main reason I love this one. It can be used indoors because it wont drip!

So if you love the looks of this one, start hunting Craigslist (I saw one in the Dallas area a few weeks ago). If you have seen any of these around, let us know where.

If you just like the idea of a beverage tub that is insulted, here are a few I found as options.


This one is by Keter and is actually a table, too. Keter Cooler at Amazon The cheapest I have found is on Amazon for $69 with free shipping.  Only four left as of now.

I actually saw is at Target as well this year, but I think it was $100 (it comes in a lot of color combinations at Target, so pay attention to the sticker on the box that tells you the color inside and out). It's called a cool bar I think.  I actually discovered this one at Bed, Bath and Beyond when I was first looking, and I see that they sell it online as well.

I must admit I'm a little jealous of this one.  It can stay outside and be protected, and function as a table when in use or not. Nice!

Tuesday, March 27, 2012

Use old plastic lids as ceiling medallions

I don't know if you have ever bought a ceiling medallion at Home Depot, but essentially there are a piece of plastic you hang between your ceiling and light fixture cap to make it look more substantial. They cost $10 to $20 each for a piece of plastic!


Now if you've read my blog you've seen me use iron wall art and old mirror frames as ceiling medallions, but by far the cheapest solution I have is old plastic lids.

Basically I found an old bucket lid laying on the ground outside my house (someone's trash most likely), and when I picked it up I thought, "that looks just like a ceiling medallion."  It was too beat up to use, so I decided to see what I had around the house. 

I looked in my tupperware drawer. I put all the pieces together to see what was left. I had a couple old larger plastic lids that didn't fit anything left, so I painted them, and put one under my bedroom ceiling fan.  You just need to cut a hole in the middle of it to make room for the wiring, etc.  (just like a real medallion has).


I put the other under my bathroom chandelier.


Easy FREE solution to something I would buy anyway (I for some reason just can't stand the look of a little 4" cap on a big light fixture).  I would have preferred larger bucket sized lids, but I used what I had.  In the future I'll be hitting up construction sites for more, when I ready to add them to my daughters rooms : )  Happy hunting.


My wine cork letter :)

Today I decided it was time to do a project I have pinned an Pinterest :). Mainly because my boards are getting cluttered, and I'm ready to start deleting the completed ones.


I realized I had everything I needed to make my wine cork letter "A". I wanted it to sit on something vs. be free standing (wanting it to have a little more presence). So I started by gluing two corks on each side of the base (a bamboo soap dish holder I had from Ikea). I used hot glue to put it all together, and it worked great.

I then added one cork at a time to each side at a slight angle. Once the sides met I just glued the top two together.

Being a letter A I also had to place the cross bar. I held two corks up to see where I wanted it, then started gluing. It turned out I needed three across the middle, but it worked out great and I just love it.

Thank you again Pinterest for all of the ideas :)

Monday, March 26, 2012

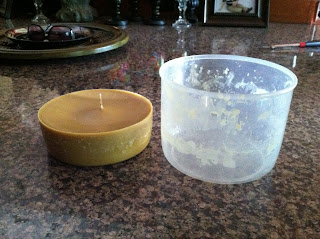
DIY candle with "remnant" wax


So this was a "use it or throw it away" day.  I went to change my scentsy wax block out and saw the pile of "used" wax I keep in my candle cabinet.  Old candle wax (where the wicks are gone but there is still wax), old scentsy wax (a jar where I pour all of the used "unscented" wax), old candles in bad colors, etc.

For this project I used an old blue taper I had for the wick.  Cut the taper in half or shorter.  The candle portion needs to be shorter than the height of the wax in the container.  This is easier to determine after the wax is poured into the container.   The wick needs to be as high as the top of the container to stabilize it (further explained below).


For the wax I primarily used the scentsy reject wax poured into these containers (there was a little old candle wax in the jar, too :)


To get the wax out of the jar, I just boiled it for a few minutes until enough melted that it would pour out.  It will just pop out of plastic. Sometimes you can break it out of a glass container with a butter knife if there is just a little, but this jar had a lot.


No photo for the next step, sorry, but once I was able to get the wax out of all the containers, I emptied this pan of water and placed all of the wax back in it.  I put it on low until it all melted and then poured it into my mold (this plastic bowl I have).  I then taped the wick to a pencil and balanced it on top to keep it centered and upright.


After refrigerating, I popped the candle out and there you have it.  A new big candle for free.  The exact amount I want to spend on every project : )


Notes:

You might use cooking spray to help get the candle out easily.  Took me longer to get it out than I wanted. 

You can easily clean the pot and bowl in the diswasher.  The hot water gets all of the remnant wax off.

In the future, I'm keeping an old taper in a jar and pouring my scentsy wax in as I use it.  Once it gets to the top of the taper, I have my candle : )

A Mason Jar works on my blender base!

Thank you to my Pinterest friends for this one.  Found an old mason jar in my candle cabinet today, so thought I would try it out on my blender to see if it fit!  It does!!!!  I have a Hamilton Beach glass blender and it fit right on.  Can't wait to grind some spices or make a dressing or whatever!  Now I'll be on the look out for more mason jars to make frozen drinks in individual servings!  Summer is looking better and better every day : )


Please note: do not use with hot or even warm liquids.  The pressure of the steam might crack the glass.

Here's what it looks like on (up close).  This is a smaller jar (I'll find a larger one to try, then I'll be on the hunt for the ones with the handles for mixed drinks ;)

Update Outdated Architectural Details

Do you have woodwork details in your house that look outdated?  Maybe an older mirror frame with a detail that's just out of style? It could be on a picture frame, a chair, a china hutch, etc. Something that just doesn't fit your decor (but the piece otherwise is just fine).  Maybe you can get a good deal on a piece with an unattractive detail!  Then all you need to do is cover it up!

Here are my corner blocks covered with a cast iron detail.


In my master bedroom, bathroom and study, my house had some corner block rosettes that were just down right ugly.  Imagine a corner block on a door frame with a hand-routed design.  It looked so cheap and old fashioned I couldn't stand it.

Drumroll please...here it is. I really don't know what they were thinking!


 Maybe for you its a shell or star detail like these.


I decided my corner blocks had to be covered up.  I could have bought new ones, finished them to match, taken out the old ones and put the new ones in.  But for fear of ruining woodwork or the sheetrock and paint, I decided to just cover it up.  I found a cast iron piece that fit the bill perfectly (and only 87 cents each!).   In Dallas we have an ironwork supplier that carries stuff like this (King Architectural Metals).  If you go to their website and search rosette you will see the extensive selection they have.  You want single faced so its flat on the back.

I used double-sided tape to put them up and it looks better than ever. The tape has held for 8 years now.  I also wet them and set them outside for a little while to get them to rust a little. Help them blend better with the wood finish.  Here's the after photo


Try an appliqué over the unwanted detail instead of getting rid of it!

Here's a before and after.  Night and day in my opinon. Hope this inspires you to update a piece of you own : )

Cover unsightly unused wall plates with ceiling tile wall art

If you are like me and have a few weird plates on your walls you don't use, here's an easy way to hide them. Use a ceiling tile!

I used one that is intended to hand on the wall. It goes right over them. In my case it was a phone outlet and audio control we don't use. It might be an unused plug, light switch, cable outlet, etc. Because these metal wall art pieces are hollow on the back, there is room for the switch plates to hide behind it and the tin still lies flat on the wall.

Easy fix for any spot on your wall that would require new sheetrock, texture and paint. Easy solution!

Friday, March 23, 2012

Hang a chandelier in your master bath

If you have ever seen my blog, you know I'm a fan of chandeliers : )  One place I absolutely love to see a chandelier hanging in a home is in the master bath.  It makes a rather sterile room come to life and become the retreat it should be for you.  If you have any sort of overhead light in there, transform the look of that room with a chandelier that compliments your decor.


For me it was a crystal chandelier I found on clearance at Tuesday Morning for $20.  I had an overhead light over my tub that was just crying out for a statement light fixture.  Twenty minutes after getting it home, it was up and turned out better than I could have ever imagined.


If you don't have an overhead light in your bathroom, look around your house.  There is somewhere you can bring a little more elegance into your home.  You're worth it :)

Thursday, March 22, 2012

Terrarium from a fish bowl and iron basket

I've been looking for a glass candle holder to put this old fish bowl on to make another footed jar. Unfortunately I just can't find anything large enough.

Today I went to store it under my china hutch, so I set it in this iron basket that was under there. I realized it actually looked really good together. Sort of like a decorative terrarium. New decoration without even trying :)

I might use it to hold wine corks when I run out of space in my other jar, too. Lots of display ideas of course :)

Wednesday, March 21, 2012

Another refinished polished brass light fixture


This one is in my master bath.  In this case I had a lot of finishes competing, so I had to mix it up.  Since the mirror molding is a black and metallic dark brown finish and a blacker iron piece is hanging above, I decided the fixture needed to be different enough that it didn't start all looking the same.  So I painted this one with brown craft paint first. Again right on the original finish. 

This is the original fixture (before the mirror frame was added).  I did not sand or prime it (since it won't be touched) or take it down (I just taped around it and removed the light globes).  I used the stipple painting technique again so it has texture.


This is after the brown (no mirror frame up yet).


As you can see its a little flat at this point.  Then I drybrushed the whole thing with the lighter metallic bronze craft paint to give it shine and interest, then I highlighted with Modern Options Sophisticated Finishes Blackened Bronze (its darker, so it gives it more richness and helps it coordinate with the darker frame and iron piece).  Notice the frame is on the mirror now : )


Here's a close up shot of the finish.


Here's the before and after shot  (quite a difference!).


Another 7 years and counting...at least I know the finish lasts : )   Good luck painting yours!

Refinish your polished brass light fixtures

I know a lot of us still have some polished brass around our house that we would love to update.

Did you know you can easily and inexpensively paint your polished brass light fixtures to update them?


This fixture is in my half bath. The only prep work I did was tape off the outer edge of the light and remove the globes. Because you don't touch light fixtures there is no risk of ruining the finish.  My fixtures have been painted for 7 years now with no issues (is was supposed to be temporary, but I won't replace them until I find a deal :)


I stipple painted on the Modern Options Sophisticated Finishes Blackened Bronze paint (to give it texture) then I dry brushed "highlights" of an espresso metallic craft paint on some of the raised parts (the color is lighter so it gives the piece more interest and depth).

Took about 30 minutes total time and it was almost free (it uses so little of the paint that is already inexpensive). Hope this helps inspire you...happy updating!

Add His and Hers Signs above your towels in your bathroom

I will admit that I bought these and they happen to fit in the exact spot I had, but you could easily make them.  Mine have a beveled mirror layer on back, then a cream and tan scrolly pattern layer on top with HIS and HERS printed on that.


If you can't find some online that you like or will fit (etsy, ebay, etc.), you could easily create your own.  Frame HIS and HERS printed designs (find them online or easily create your own in Microsoft Paint or Photoshop). You could frame a decorative piece of paper and then stencil his and hers onto it (or use cricket letters or sticker letters).  You could even use a framed mirror for the back, then add the framed words on top.  Adds a decorative detail to a boring hook : )  Happy decorating!

Use oven cleaner to "darken" brass

If you still have shiny brass items lying around your house, you can always paint them like I have demonstrated in several of my posts, but did you know you can chemically darken them?

This piece was a bright brass planter from garden ridge.  It is real brass.


If you have any real brass that isn't lacquered, just spray it with oven cleaner and it will tarnish to a dark finish. Of course do this outside since oven cleaner fumes are bad. I leave it on and reapply as needed to get the darkness I want. If it is lacquered or polished with something preventing the oven cleaner from penetrating, you can try mineral spirits or paint thinner to break through the coating. I know steel wool will get through it, but it will scratch.

Obviously don't do this on something expensive you care about and wouldn't be willing to paint if it didn't turn out the way you want. It also won't work on fake brass. Good luck updating :)