

Sunday, January 27, 2013
Use a wall plate rack to hold picture frames!
Two tricks to touch up paint when your paint drys out!

So I've been re-doing my kids bedrooms, converting from twin loft to full beds. Once the beds were switched and furniture/wall art was moved as needed, it was time to touch up the nail holes.
I go to the garage and find the five colors, open them up, and whoops. The light pink was almost completely dried out.

The sage green is as well. Great! I've got 10 holes to cover in pink and patched hole to paint in the sage! First I tried a trick that worked for me before. I put a piece of the not quite dry paint from the bottom in water (the paint is latex) to see if I could reconstitute it. I had done this with my flat wall paint in the past.
This worked for the sage, but it was the consistency of chewed gum. I was able to paint a small area I had patched and never painted back over successfully.
So that's tip #1. If your paint isn't completely dried out, you can try to grind it into a little bit of water to see if it will incorporate enough to use.
The pink was completely dry and I was at a loss. But then something amazing came to me. As I tried to peel the paint off the bottom to try to reconstitute it, some peeled off the side of the can. I thought, wow, wish I could just stick this on the wall. WAIT! I can! So, armed with a glue stick, this strange piece of paint and a small cloth, I proceeded to go try.

It was so easy, I could hardly believe it. Here is one example of a hole I had to cover.

First I spackled the holes with this.


I used one finger to place that piece on the glue stick and take off, then I used a clean finger to place it on the wall (that kept the piece from sticking to my finger instead of the wall). I could not believe what I saw. It was perfect. You could not tell where I had patched it!

It was that easy!
I had to share this tip. I've been through this three times and had never thought of this. Kind of reminds me of the nail polish on plastic pin on Pinterest to peel and place on your nails :)
Hope this helps someone who is in a panic that they are going to have to repaint a room because their touch up paint has dried :)
Wednesday, January 23, 2013
How to recover a lamp shade : )

Or I guess I should call this "How I Recovered My Lamp". Let's get real, no two lamps are the same and no one can ever have the same supplies.
Here is what I started with (this is with the trim ribbon pulled off and the edge tape pulled off).


My fabric was a previous shower curtain I purchased in the Ikea "as is" section for 99 cents. I had used it in my daughters bathroom (as decoration only...they have shower doors). Once we changed it out, this one went into the fabric bin : )

For my fabric I measured and cut, but this time I had to "burn" the edges of the fabric because it frayed. This shower curtain looks and feels like fabric but it primarily plastic or polyester. I've mentioned this before, but you just use a lighter to quickly "seal" the edges of this type of fabric and it melts it slightly so it won't fray. I then applied it the same way with hot glue.
I then reapplied the edge tape (stuck back down just fine).

Here is is with all the edge tape back on.


Reapply the shade and voila! New, more grown up lamp for free : )
Monday, January 7, 2013
Walmart boots laced even cuter
My daughter has been dying for tall wedge boots. We even spotted a cute pair at Ross before Christmas, but they didn't have her size at any of the stores by us. So yesterday we decided to hunt our local "mills" outlet mall and came up empty handed. Rue 21 had a pair that was close but didn't have her size either.
Today I ran to Walmart for a return and came upon these cute boots for $25 that were almost exactly like the ones we saw at Ross and at the same price.

Brought them home for her to try and they looked a little sloppy. The tops just kind of flop with nothing holding them together.
So we decided to force the tops to lace. We "punched" through the faux fur twice on each side and continued lacing them up. Made them look slimmer and helped the laces look less sloppy, too.
Here they are side by side before and after. Luckily they have a side zipper so the laces don't have to be re-tied each time risking ruining the punched holes.

Easy quick fix for a cute inexpensive pair of winter boots :) I just used a large injector tip to punch a hole, but you could use a nail even. Lastly they had them in black, too : )
Sunday, January 6, 2013
My latest wine cork letter
So, I got bored the other day after putting away all of my Christmas decorations. My home was looking a little "naked" after all of the beautiful "extra" decorations were put away. I decided there was a spot on one of my shelves in my bar that needed a little something, and this is where crafting/decorating begins in my home :). What would I make? A wink cork letter of course :). What else would you make for your bar? I had already done a capital A, so I decided to do a lower case a. One like an old typewriter would make vs. a cursive lowercase a. I was worried that it wouldn't stay because the top arm wouldn't have support once it was complete. But as you can see, it turned out just fine.

Tip: Let it dry or cure overnight laying down. Even though I used hot glue which dries quickly. It still needed to set overnight so it wouldn't droop once I stood it up.

Tip: Let it dry or cure overnight laying down. Even though I used hot glue which dries quickly. It still needed to set overnight so it wouldn't droop once I stood it up.
Sunday, December 16, 2012
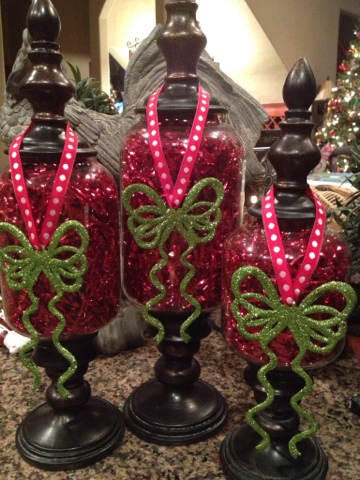
Christmas apothecary jars
Here are my latest holiday apothecary jars for Christmas. I used the red confetti filler from Dollar Tree and green bow ornaments tied with red and white ribbon. Decided not to spell a word this time, because I set my noel sign right in front of them. Looked like too many words :)
Friday, December 14, 2012
Great gingerbread house party game
We just had a gingerbread house decorating contest at our bunco group Christmas party...so fun!!!! My friend Laurie and I by far made the best one. Total cake wars!


Subscribe to:
Posts (Atom)